Showing posts with label Crafting. Show all posts

Monday, August 12, 2013

DIY Heart String

Another wedding DIY craft attempt...mod podge hearts on a string. 

Supplies:
Mod Podge
Yarn 
Heart-shaped Balloons 


Instructions:
Step 1: Blow up a heart baloon about 1/4 of the way. Tie it off.
Step 2: Cut the yarn into several pieces. 
Step 3: Dip the yarn into the mod podge and wrap around the balloon. Repeat this until most of the balloon is covered.
Step 4: Let dry.
Step 5: Pop balloon and pull out of the heart. 
(Optional) Step 6: Run string through the hearts to create a string of hearts. I also added tulle in the center of my hearts. 

Time: 15 minutes per heart
Cost: $10 (includes Mod Podge; you will only use a small amount)


In case you need some tunes to go with your crafting:

Phillip Phillips "Gone, Gone, Gone"

Saw it! Pinned it! Did it!-Lace & Pearl Bracelet

I saw this Lace & Pearl Bracelet on Pinterest and I absolutely loved it. I thought it would be a great gift for my bridesmaids-to-be.

Here is what I used:
  • leather cording – 28″ is recommended
  • lace (hem tape lace is easier to use)
  • pearls – I used 16
  • thread
  • Needle (make sure the needle is thin enough to fit through the size 16 pearls)
  • Larger bead to connect (Optional)


Step 1: Cut cord into 2-16 inch pieces. Depending on the size of your wrist, you may need less or more. 
Step 2: String thread through needle and first piece of cord. String through pearl and then second piece of cord.
Step 3: String thread back through the same piece of cord. Add another pearl. And string through the first piece of cord. Repeat until you have reached the desired length. 
Step 4: Knot thread and cut remnants. 
Step 5: Wrap lace between cords and pearls on both sides (after doing this, you should not see the cord anymore).
Step 6: Tie lace around cord at the end. 
Step 7: On one side make two knots. One knot should be at the end of the pearl and the other about 3/4 inch. further (this is for the knot on the opposite side of the bracelet, in order to connect around your wrist). 
Step 8: Enjoy your new piece of jewelry. 


Wednesday, May 22, 2013

DIY Wall Decor

Want a super cheap, but trendy wall decoration? I made some DIY Wall Decor using Embroidery hoops, fabric, and buttons. I actually stole this idea from a friend (if your reading Britt, thanks!). To make all three of the hoops it costed me $5. I used some of the leftover fabric from the DIY Pillows  and made some matching decorations. Here they are:


Materials:
Embroidery Hoops
Fabric
Buttons (Optional)

Note: You could also sew on a fabric or lace flower mentioned in a previous post...DIY Flowers

Steps:
1. Cut the fabric to fit in the hoops. I cut a square and then cut the excess fabric.
2. Put in the hoops and you are done, too easy.
3. Or add any embelishments you would like. 
4. Then you are done! :)


THE ENTIRE SET! 
all for under $25 and in about 3 hours of time


DIY Pillows


The flowers referenced in the previous post were used to finish off my first DIY pillow. I never would have thought that making your own pillows would be so easy, fast, and MUCH cheaper than buying them from somewhere. Each pillow took me about an hour to finish. In total I spent $25 for all the materials, which include: pillow form, fabric, needle, and thread. It is important to note that I still have enough material to make 2 more pillows! I also purchased craft thread with the intention of making tassles for the pillows, but the flowers won out. Stay tuned for pillows with tassles. I'll try to make this as easy to follow as possible.
How to make DIY Pillows:


1. Cut both pieces of fabric to desired size. The pillow form I bought was 12x16. I chose to cut an extra 1/2 inch on both sides of the fabric for extra room with stitching. This worked great! I would suggest adding adding another 1/2-1 inch on for non-stretchy fabric. One of the pillows I did had both sides of jersey knit (very stretchy) and one had more of canvas fabric with jersey knit on the backside. It was more of a struggle to fit the pillow form in with the second (canvas) pillow. 

2. Add any additonal embelishment to the fabric. This is when I added my flower.


3.Place the fabrics on top of each other inside out-the side you actually want to see needs to be facing down. For example, my flower was facing the other fabric (down) while stitching. This is because you will flip the fabric out after stitching to avoid seeing the actual thread. 

4. Straight stitch three sides of the pillow. There is a picture in the above collage of an example, otherwise feel free to  reference this video for instructions: 


5. Flip the fabric out and insert the pillow form (or stuffing).
6. Blind stitch the 4th side without wanting to throw the pillow in the garbage and scream profanities :) 
Blind Stitch Tutorial:


7. Ta Da! You have your own homemade pillow!


DIY Flowers

It doesn't get better than listening to Darius while sipping on some wine and CRAFTING! With very little knowledge of various fabrics and sewing I got to work on a few gifts. Flowers can be added to so many things: gift boxes, hair pieces, wall decorations, and...pillows. Here are a few examples of DIY flowers I have added to some DIY pillows. They are easy, fast, and cheap-perfect for me!

Materials:
Buttons (optional)
Fabric of your choice (I used lace and jersey knit fabric) - both of which were found in the remnents section at JoAnn Fabrics
Needle and Thread
Hot Glue


Steps to making this DIY {Knit} Fabric Flower:
1. Cut out petal shapes in various sizes (the ones for these flowers ranged from 1-3 inches in length)
2. Dab some hot glue at the bottom edge of the petal and squeeze the two sides together. Do this for half of the petals, leave the other half flat.
3. Organize the petals in a way that you would like. I used 3 flat petals for the bottom, then placed 3 more petals on top of those in the opening spots, and so on until you are out of petals. The smaller/squeezed petals should be on the top. 
4. Hand stitch buttons on in the center of the flower. 

Optional: The knit fabric I used was very flimsy. I used a more firm piece of fabric to glue the flower onto before attaching the flower to the actual pillow fabric (pictured above). I then hand stitched the entire piece onto the pillow. 


Steps to making a DIY {Lace} Flower:
1. Cut out a strip of lace -the more flexible the better!
2. Hold the bottom of the strip and start to acordian fold ONLY the bottom of the strip. Use your thumb to help grasp the lace. Use dabs of hot glue to keep the fabric from coming loose.
 This step is hard to explain, here is an image to help:


3. Hand stitch a button as the center
4. Hand stitch or glue the flower onto the object, for example, pillow

Optional: If one strip of lace does not work, you can use two and simply glue them together at the end.


Happy Crafting!


Tuesday, May 21, 2013

Fabric Tie Banner

Just spent about 30 minutes TOTAl making a fabric tie banner. The total cost about $5....remnents bins and clearance fabric is the way to go. This decoration is super easy, fun, fast, and cheap! :)


The materials simply include cord/rope, fabric of your choice, and scissors. I chose neutral toned fabric and added some lace in at the end. I thought this could be a nice wedding decoration to hang across one of the banquet tables...we will see.

Here is the EASY step-by-step:
1. Cut the fabric into strip (remember you will be tieing the fabric so factor that in when trying to measure)
2. Simply tie the fabric to the cord/rope (I tied all of one color at various points on the cord and then switched to the next color)
3. Hang and enjoy! 


Monday, May 20, 2013

Homemade Baby Onesies

I have to admit I was a little skeptical about making baby onesies using puffy paint, but after finding some inspiration online they actually turned out pretty cute. Friends of mine are starting to have babies, and these are the perfect gifts for people on a budget. Plus, they are homemade, which in my mind can be more meaningful. Here were the ones I came up with (I can't take credit for the ideas though):


Other onesie ideas include:
-Sweet Pea
-Cute as a Button (add buttons to the onesie)
-Bow tie
-Chevron (another lady making these with me made one and it was SUPER cute)
-Sweetie Pie

It is so easy too. Have an idea? Stencil, free hand, or trace a design onto a onesie. Use puffy paint and a paintbrush to complete. We actually made these during a baby shower. It was a great idea and they all turned out super cute.


Friday, February 22, 2013

Crafting on a Budget

Crafting on a Budget: Book Page Paper Flower and Dry Erase Part II


Book Page Flower
Materials: Hot Glue, Book Pages

I bought an old book from Goodwill for $1. I then cut four different size petal shapes (5 of each size ranging from 3 inches in diameter to about 1)-measurements don't need to be exact. Roll over the edges of each piece. For the center I just rolled up a small piece of piece in a cylinder. This is what I began gluing the pieces (beginning with small) to. You can create smaller or larger flowers depending on the size of the petal. Here is how mine turned out:


(Hanging) Dry Erase Board 
Materials: Fabric/Paper, Frame

I used the same steps to create this as I did the previous Dry Erase Boards. TOO EASY!  However, I use these WAY more often. All you need is some fabric or paper and a frame. Insert the fabric or paper into the frame, grab a dry-erase marker and you are all set! These are great for notes, lists, and reminders! The best part is it cost me less than $3. I found burlap in the remnants section at Hobby Lobby.


Complete!

Tuesday, February 12, 2013

Products of Craft Night


cardmaking-a recent and wonderful obsession of mine

All of my cards are pretty basic, EASY, and AFFORDABLE. My hope is that if I spend time making homemade cards maybe people will keep them, and to me, they definitely hold more meaning . Writing a thoughtful message, instead of just signing can obviously help this too. Not to mention, making cards is a huge $$ saver. Store bought cards (not in the dollar section) get a bit pricey. Especially for something most people will throw away. I like to purchase my stamps and materials form JoAnn, Micheals, Hobby Lobby, and Tuesday Morning. Shop around, find deals, use coupons ALWAYS! At least one of these stores will have a coupon or sale, if not ALL of them.


Just a tip-if you are sending homemade cards in the mail, make sure they have enough postage. I have mistakenly sent cards to people and they had to pay a few cents for extra postage. "Happy Birthday, you owe 6 cents to receive your own birthday card"...whoops. 


Time Saver Items worth investing in ASAP:
-Paper Cutter (unless you have access to one, if you do, use it!)
-Circle Cutter
-Hot Glue Gun
(I use all of these for almost every card I make)

Sunday, February 10, 2013

DIY Flower Bobby Pins

Week Four (should be five, whoops!) of Crafting on a Budget


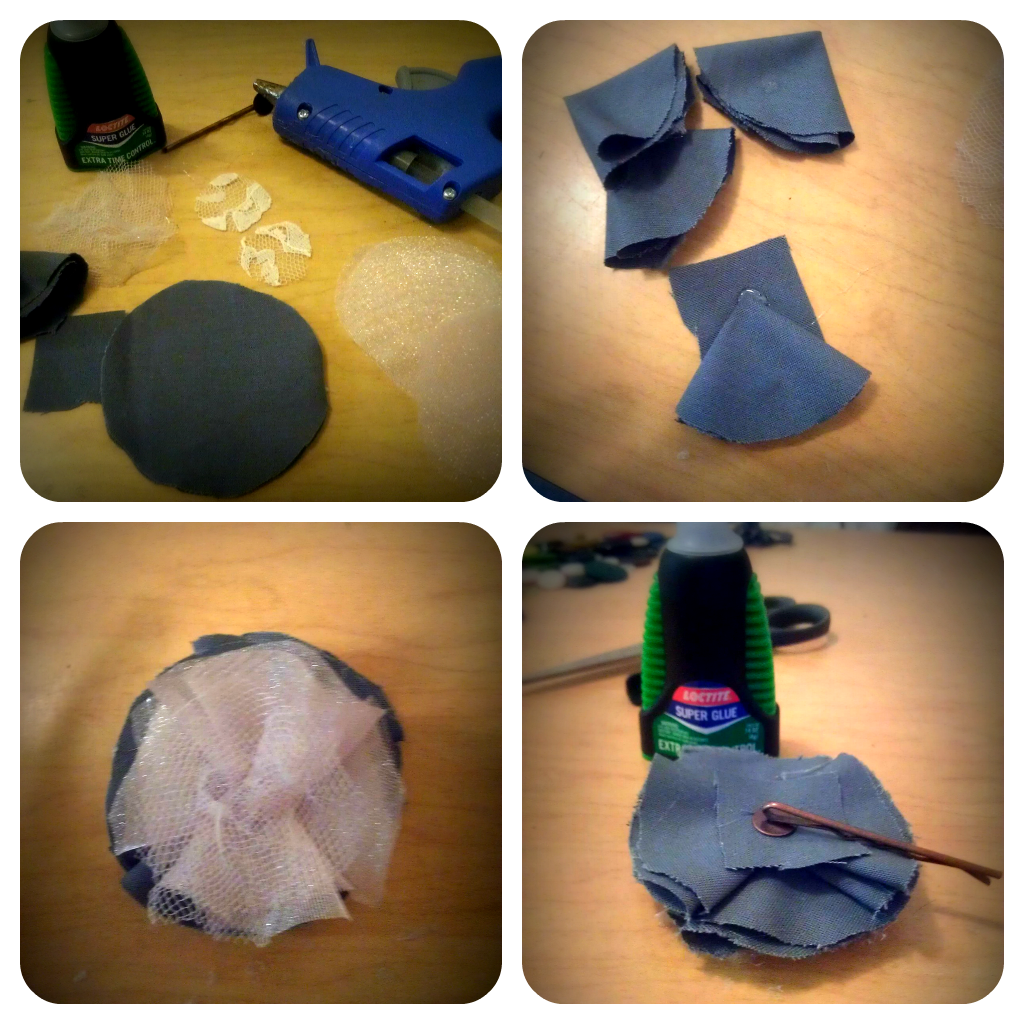
I am really excited about these cute hair pieces to be worn at a time TBD. These were EASY and CHEAP! The best two characteristics of a craft, I think. The pictures should really give you good explanation of how to make them. I spent about $10 at JoAnn Fabric-great store and they always have coupons. I have enough material to make about 15 larger hairpieces. You could probably make about 20 with smaller flowers. 

Materials: Hot Glue, Super Glue, Fabrics of your Choice, Bobby Pins with Pad
Step One: Cute fabrics into various size circles
Step Two: Fold circles in half twice (you will have to put a dab of glue between folds)
Step Three: Glue pizza-shaped fabric pieces in a circle on a piece of fabric. Continue to layer with other fabrics. 
Step Four: Super Glue Bobby Pin to back of flower
Step Five: Add a center piece (I used twine) of your choice. This could be a button, pearl, ribbon, etc.
Step Six: Use it! :)


Sunday, January 27, 2013

Week Three of Crafting on a Budget: Fun with Words!

For this week's craft, all you need is some paper and a fine point pen or marker! While doing my daily Pinterest browse I was inspired to have some fun with letters and words, so I thought I would do some hand lettering. Here is the result: 


It's my first shot at it, but I will certainly keep practicing. It can be useful for card making, scrapbooking, and eventually addressing envelopes (that is my next task)! Happy Crafting! 

Sunday, January 20, 2013

Week Two of Crafting on a Budget: DIY Dry-Erase Board


This cost me less than $5 and took me less than 5 minutes to make. 
These DIY Dry Erase Boards make great gifts. and decorations for the home.

Supplies
Picture Frame (I bought one for $1 at Goodwill), buttons (optional), burlap (or any fabric), and glue


ENJOY.


Sunday, January 13, 2013

Week One of Crafting on a Budget: Coffee Filter PomPoms


It turned out! :)


Supplies
Paint color of your choice 
Paint Brush/Sponge (can use spray paint or dye to save time)
120 Coffee Filters (makes 4 PomPoms)
Something to paint on and let coffee filters dry on-drop cloth, cardboard, etc.
Cord/Ribbon to string PomPoms through
Scissors or Hole Punch
THAT'S ALL!
           

Guide to making Coffee Filter PomPoms 

Step One: Compile supplies
Step Two: Dampen coffee filters until they lay flat

Step Three: Paint one side of the coffee filter and lay to dry
Step Four: Continue for 30 filters
Step Five: Wait for filters to try (approx. 15 minutes)

Step Six: Fold dry coffee filter in half and then in thirds-will look like a pizza slice
Step Seven: Poke a hole about 1/2 in. above point of coffee filter
Step Eight: String coffee filter onto cord
 Step Nine: Tie a knot (that is larger than the hole in the filter) in the cord 
Step Ten: Repeat Steps Six-Eight for all 30 filters


Step Eleven: (Pretend this is 30 filters) Tie a knot in the cord at this end of the PomPom
Step Twelve: Now for the FUN part (kind of)...


 ...start creating the PomPom-seperate each filter as much as possible.

 And you have your very own Coffee Filter PomPom

I made four of them and strung them on the same cord-now a living room decoration.


I enjoyed making these, and do think that I could incorporate them into the wedding somehow. Yay! I purchased paint in other colors as well, so if/when I finish a few more strings I will share photos. 

This craft is pretty cheap, it cost me less than $5 to create this string (plus I have enough to make a few more).  It is however time consuming. Therefore, I have a few tips to save some time. If you have means to dye the filters or spray paint this will save you LOADS of time. Do It! I just didn't have the space or supplies. Painting was relaxing, relatively clean, and easy though. Also, if you have a hole puncher that has a small hole punch, that will also save you time. I used a scissors to poke the holes. Lastly, you can use any colors or combinations; I think multi-color PomPoms or different sizes (use smaller filters) would look really neat. You should try it! 


Now, off to think of next week's craft (or work on homework)...Happy Sunday!