Showing posts with label DIY Wedding. Show all posts

Monday, August 12, 2013

DIY Heart String

Another wedding DIY craft attempt...mod podge hearts on a string. 

Supplies:
Mod Podge
Yarn 
Heart-shaped Balloons 


Instructions:
Step 1: Blow up a heart baloon about 1/4 of the way. Tie it off.
Step 2: Cut the yarn into several pieces. 
Step 3: Dip the yarn into the mod podge and wrap around the balloon. Repeat this until most of the balloon is covered.
Step 4: Let dry.
Step 5: Pop balloon and pull out of the heart. 
(Optional) Step 6: Run string through the hearts to create a string of hearts. I also added tulle in the center of my hearts. 

Time: 15 minutes per heart
Cost: $10 (includes Mod Podge; you will only use a small amount)


In case you need some tunes to go with your crafting:

Phillip Phillips "Gone, Gone, Gone"

Saw it! Pinned it! Did it!-Lace & Pearl Bracelet

I saw this Lace & Pearl Bracelet on Pinterest and I absolutely loved it. I thought it would be a great gift for my bridesmaids-to-be.

Here is what I used:
  • leather cording – 28″ is recommended
  • lace (hem tape lace is easier to use)
  • pearls – I used 16
  • thread
  • Needle (make sure the needle is thin enough to fit through the size 16 pearls)
  • Larger bead to connect (Optional)


Step 1: Cut cord into 2-16 inch pieces. Depending on the size of your wrist, you may need less or more. 
Step 2: String thread through needle and first piece of cord. String through pearl and then second piece of cord.
Step 3: String thread back through the same piece of cord. Add another pearl. And string through the first piece of cord. Repeat until you have reached the desired length. 
Step 4: Knot thread and cut remnants. 
Step 5: Wrap lace between cords and pearls on both sides (after doing this, you should not see the cord anymore).
Step 6: Tie lace around cord at the end. 
Step 7: On one side make two knots. One knot should be at the end of the pearl and the other about 3/4 inch. further (this is for the knot on the opposite side of the bracelet, in order to connect around your wrist). 
Step 8: Enjoy your new piece of jewelry. 


Tuesday, May 21, 2013

Fabric Tie Banner

Just spent about 30 minutes TOTAl making a fabric tie banner. The total cost about $5....remnents bins and clearance fabric is the way to go. This decoration is super easy, fun, fast, and cheap! :)


The materials simply include cord/rope, fabric of your choice, and scissors. I chose neutral toned fabric and added some lace in at the end. I thought this could be a nice wedding decoration to hang across one of the banquet tables...we will see.

Here is the EASY step-by-step:
1. Cut the fabric into strip (remember you will be tieing the fabric so factor that in when trying to measure)
2. Simply tie the fabric to the cord/rope (I tied all of one color at various points on the cord and then switched to the next color)
3. Hang and enjoy! 


Wednesday, March 27, 2013

DIY Tying the Knot Wire Rings

A few weeks ago I noticed a lady wearing a wire heart ring, and was inspired to try myself. Instead of the heart, I thought about creating some "tying the knot" rings. I used 20-gauge wire, a round-nose jewelry plier, and a highlighter for sizing. These were pretty easy to make and of course, cheap! It costed me about $10 for the pliers and wire, and I still have plenty of wire. It also took me about 30 minutes to make about 10 rings!

Steps to making DIY Knot Ring:
1. Wrap the wire around a sizing tool (highlighter, chapstick, etc.)
2. Leave an even amount, about an inch on both sides, after the wrap. 
3. Make a loop with one side of the wire. 
4. Stick the other end of wire through the loop. 
5. Bend both ends around the "knot" and secure them in the back 


Hope the special recipients like them! :)

Sunday, February 10, 2013

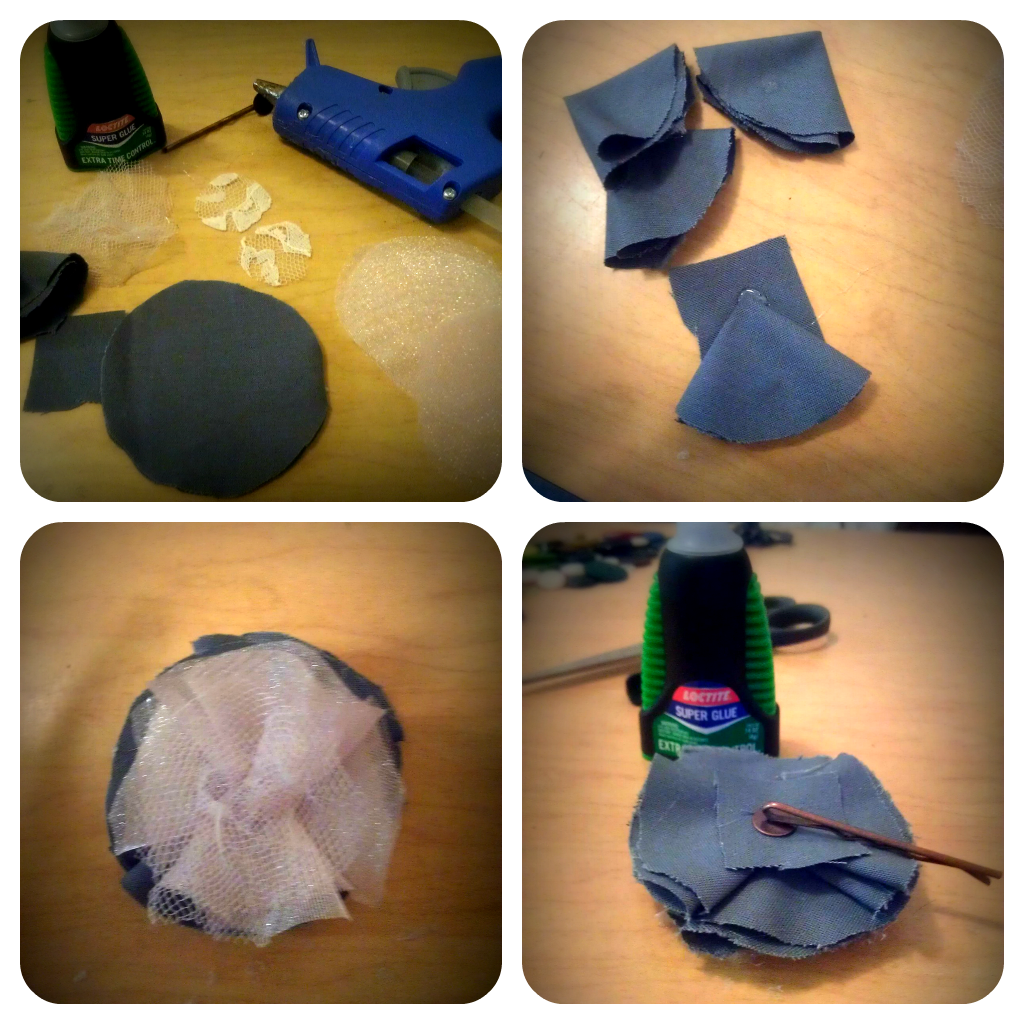
DIY Flower Bobby Pins

Week Four (should be five, whoops!) of Crafting on a Budget


I am really excited about these cute hair pieces to be worn at a time TBD. These were EASY and CHEAP! The best two characteristics of a craft, I think. The pictures should really give you good explanation of how to make them. I spent about $10 at JoAnn Fabric-great store and they always have coupons. I have enough material to make about 15 larger hairpieces. You could probably make about 20 with smaller flowers. 

Materials: Hot Glue, Super Glue, Fabrics of your Choice, Bobby Pins with Pad
Step One: Cute fabrics into various size circles
Step Two: Fold circles in half twice (you will have to put a dab of glue between folds)
Step Three: Glue pizza-shaped fabric pieces in a circle on a piece of fabric. Continue to layer with other fabrics. 
Step Four: Super Glue Bobby Pin to back of flower
Step Five: Add a center piece (I used twine) of your choice. This could be a button, pearl, ribbon, etc.
Step Six: Use it! :)


Sunday, January 13, 2013

Week One of Crafting on a Budget: Coffee Filter PomPoms


It turned out! :)


Supplies
Paint color of your choice 
Paint Brush/Sponge (can use spray paint or dye to save time)
120 Coffee Filters (makes 4 PomPoms)
Something to paint on and let coffee filters dry on-drop cloth, cardboard, etc.
Cord/Ribbon to string PomPoms through
Scissors or Hole Punch
THAT'S ALL!
           

Guide to making Coffee Filter PomPoms 

Step One: Compile supplies
Step Two: Dampen coffee filters until they lay flat

Step Three: Paint one side of the coffee filter and lay to dry
Step Four: Continue for 30 filters
Step Five: Wait for filters to try (approx. 15 minutes)

Step Six: Fold dry coffee filter in half and then in thirds-will look like a pizza slice
Step Seven: Poke a hole about 1/2 in. above point of coffee filter
Step Eight: String coffee filter onto cord
 Step Nine: Tie a knot (that is larger than the hole in the filter) in the cord 
Step Ten: Repeat Steps Six-Eight for all 30 filters


Step Eleven: (Pretend this is 30 filters) Tie a knot in the cord at this end of the PomPom
Step Twelve: Now for the FUN part (kind of)...


 ...start creating the PomPom-seperate each filter as much as possible.

 And you have your very own Coffee Filter PomPom

I made four of them and strung them on the same cord-now a living room decoration.


I enjoyed making these, and do think that I could incorporate them into the wedding somehow. Yay! I purchased paint in other colors as well, so if/when I finish a few more strings I will share photos. 

This craft is pretty cheap, it cost me less than $5 to create this string (plus I have enough to make a few more).  It is however time consuming. Therefore, I have a few tips to save some time. If you have means to dye the filters or spray paint this will save you LOADS of time. Do It! I just didn't have the space or supplies. Painting was relaxing, relatively clean, and easy though. Also, if you have a hole puncher that has a small hole punch, that will also save you time. I used a scissors to poke the holes. Lastly, you can use any colors or combinations; I think multi-color PomPoms or different sizes (use smaller filters) would look really neat. You should try it! 


Now, off to think of next week's craft (or work on homework)...Happy Sunday!